- Client ID
- Client Secret
Pre-requisites
- Zoho Developer Console. You can create one here.
Required Settings
- Mandatory Scopes
- ZohoRecruit.users.READ
If you haven’t already created an app in Zoho Recruit, you’d need to create one.
Creating an app in Zoho Recruit
To create a Zoho Recruit app and acquire the above mentioned credentials, please follow the steps mentioned below:- Log in to your Zoho Developer Console.
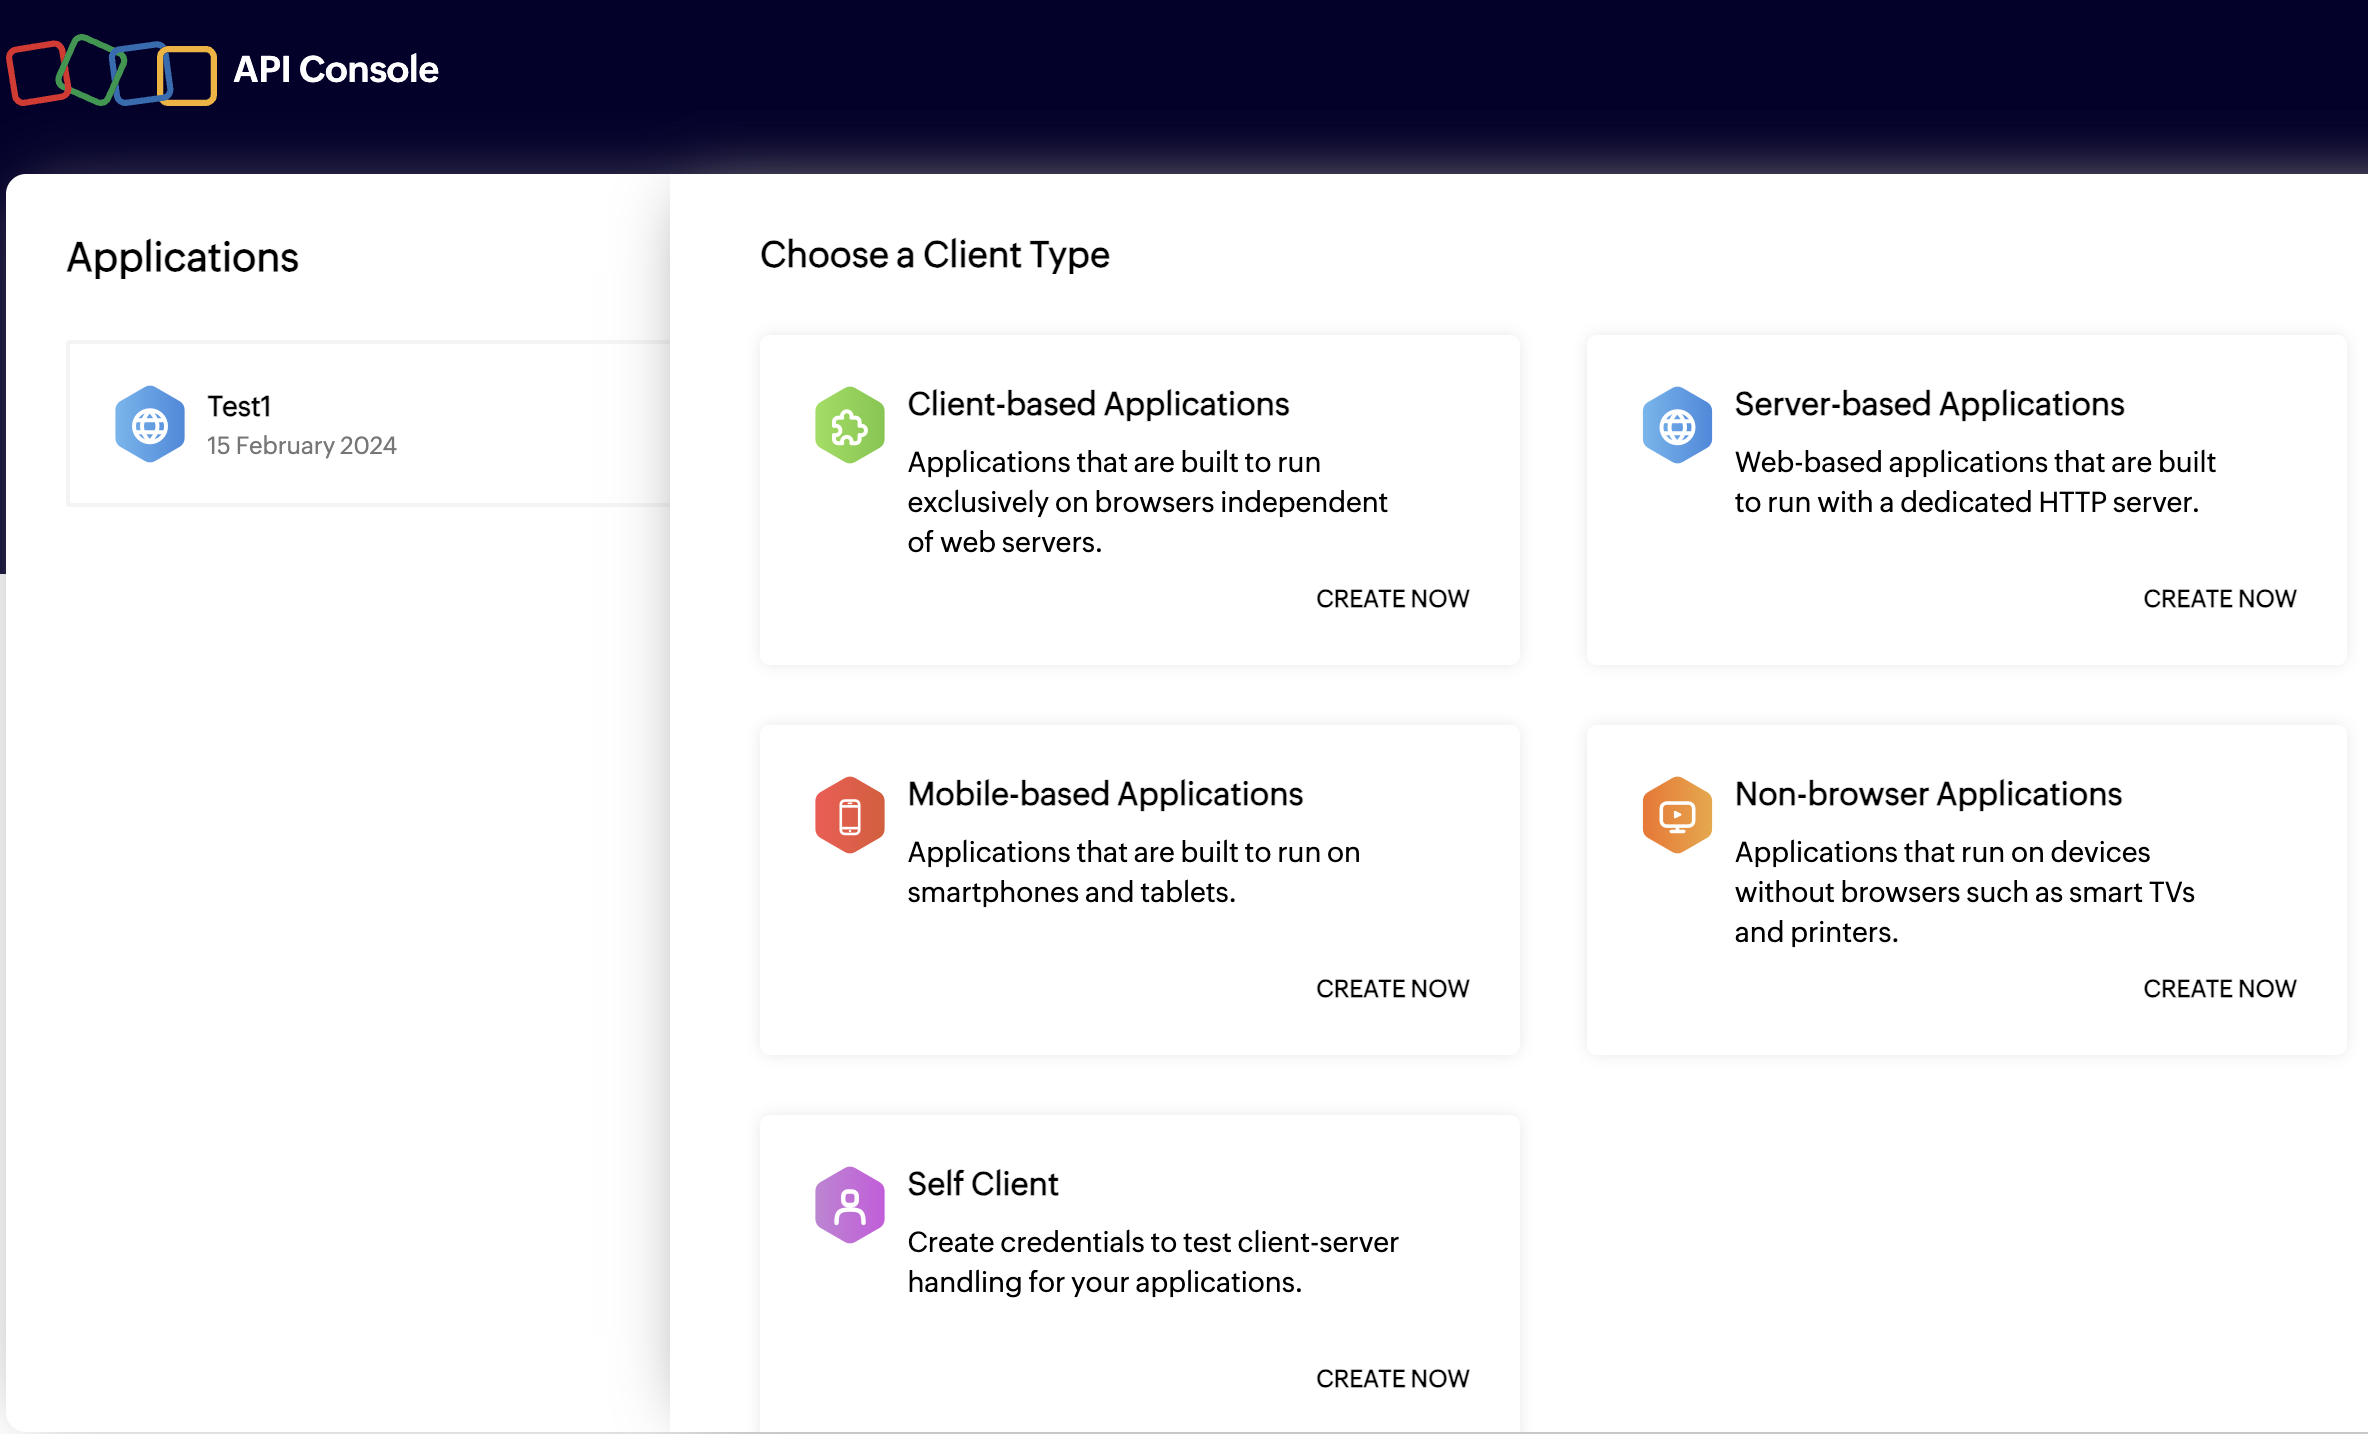
- Click on the
+ Add Clientbutton in the right and selectServer-based Applicationsbutton.
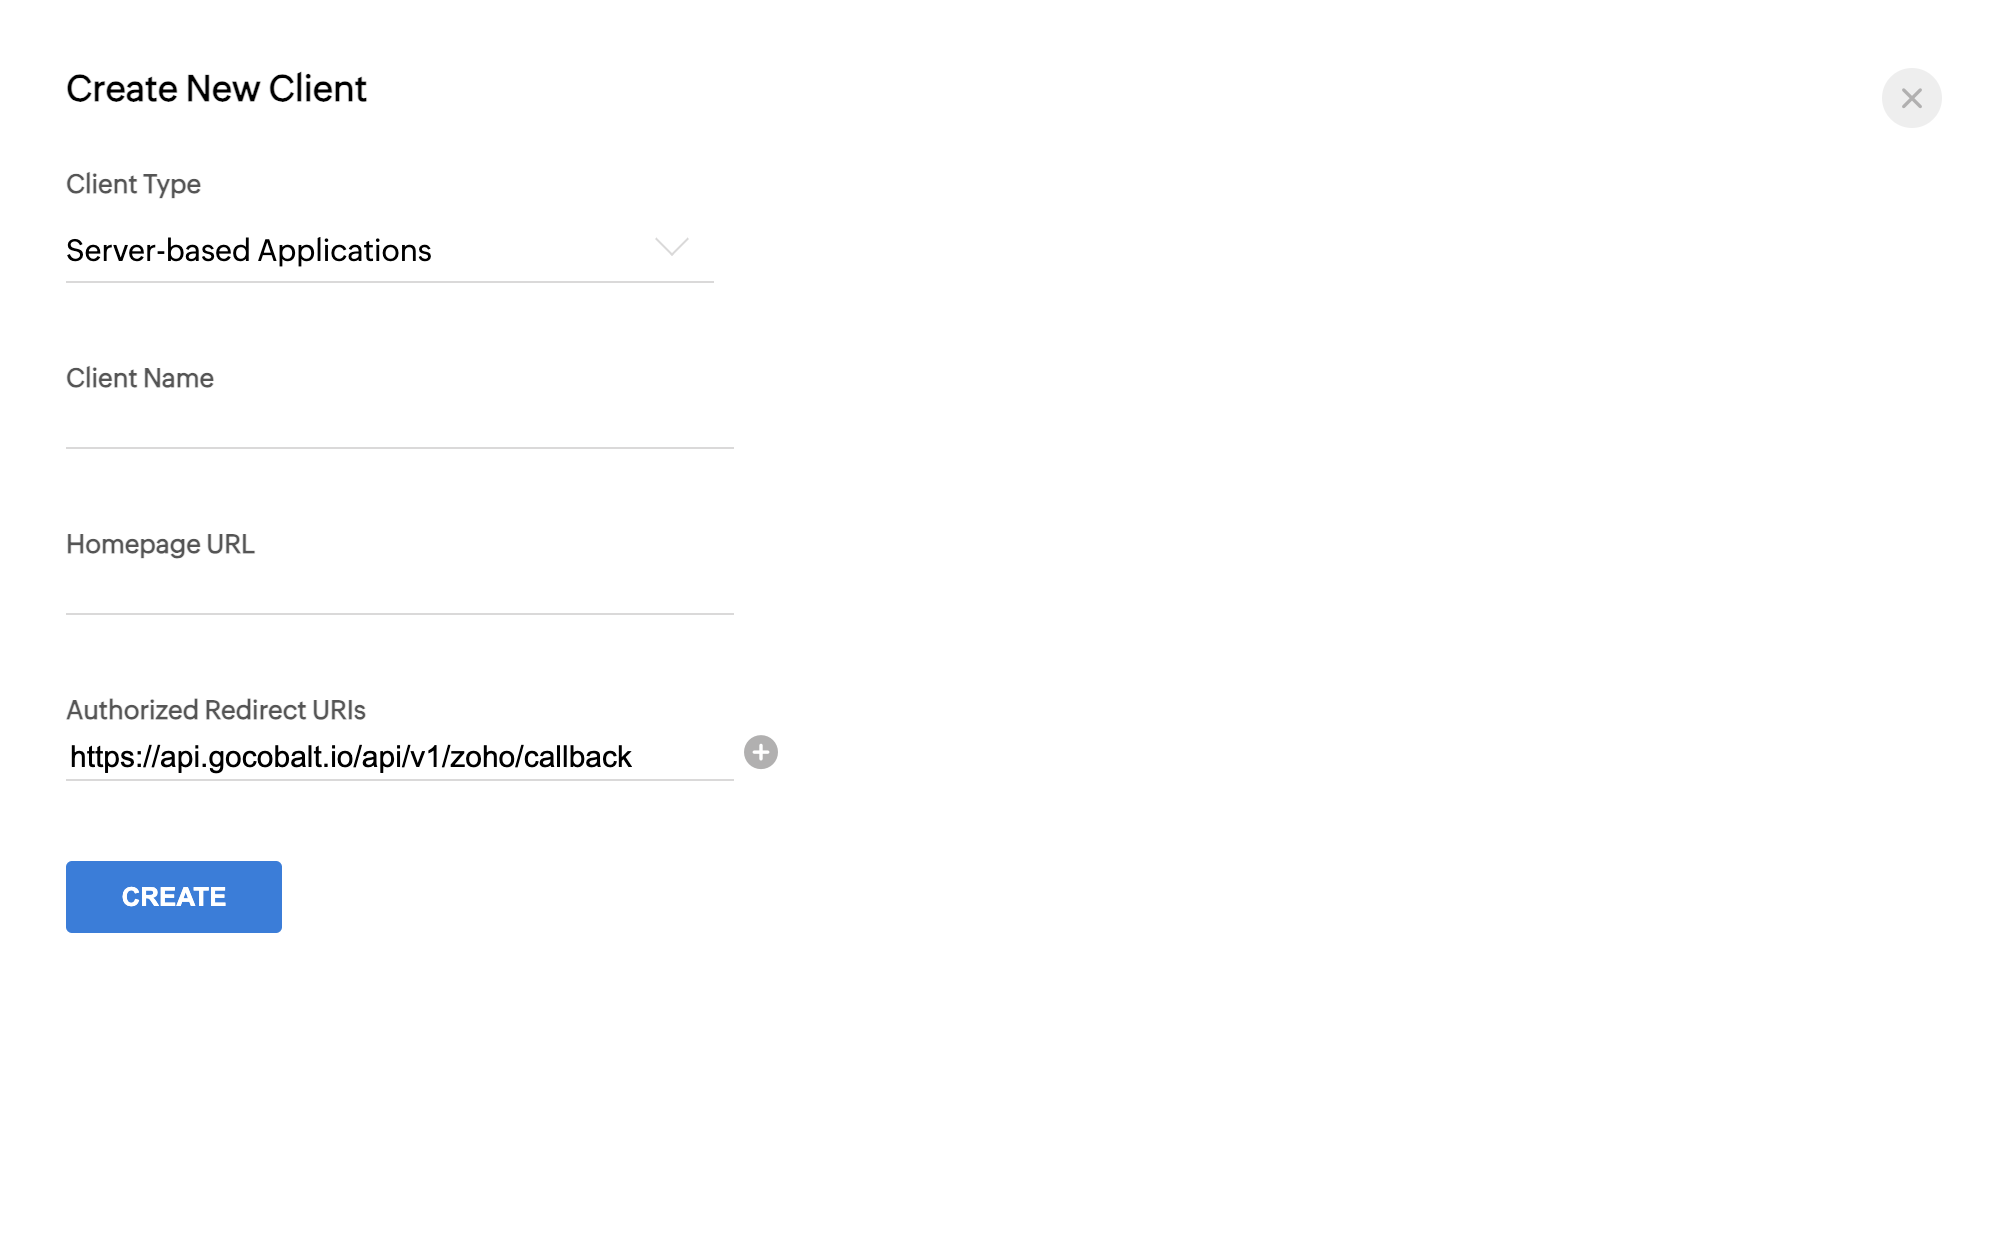
- Enter the Client Name for your application and add a Homepage URL.
- Go to your
Apps catalogin Cobalt > Search forZoho Recruit>Settings>Callback Url> Copy it. - Paste the Callback URL under
Authorized Redirect URIsand click on theCreatebutton.
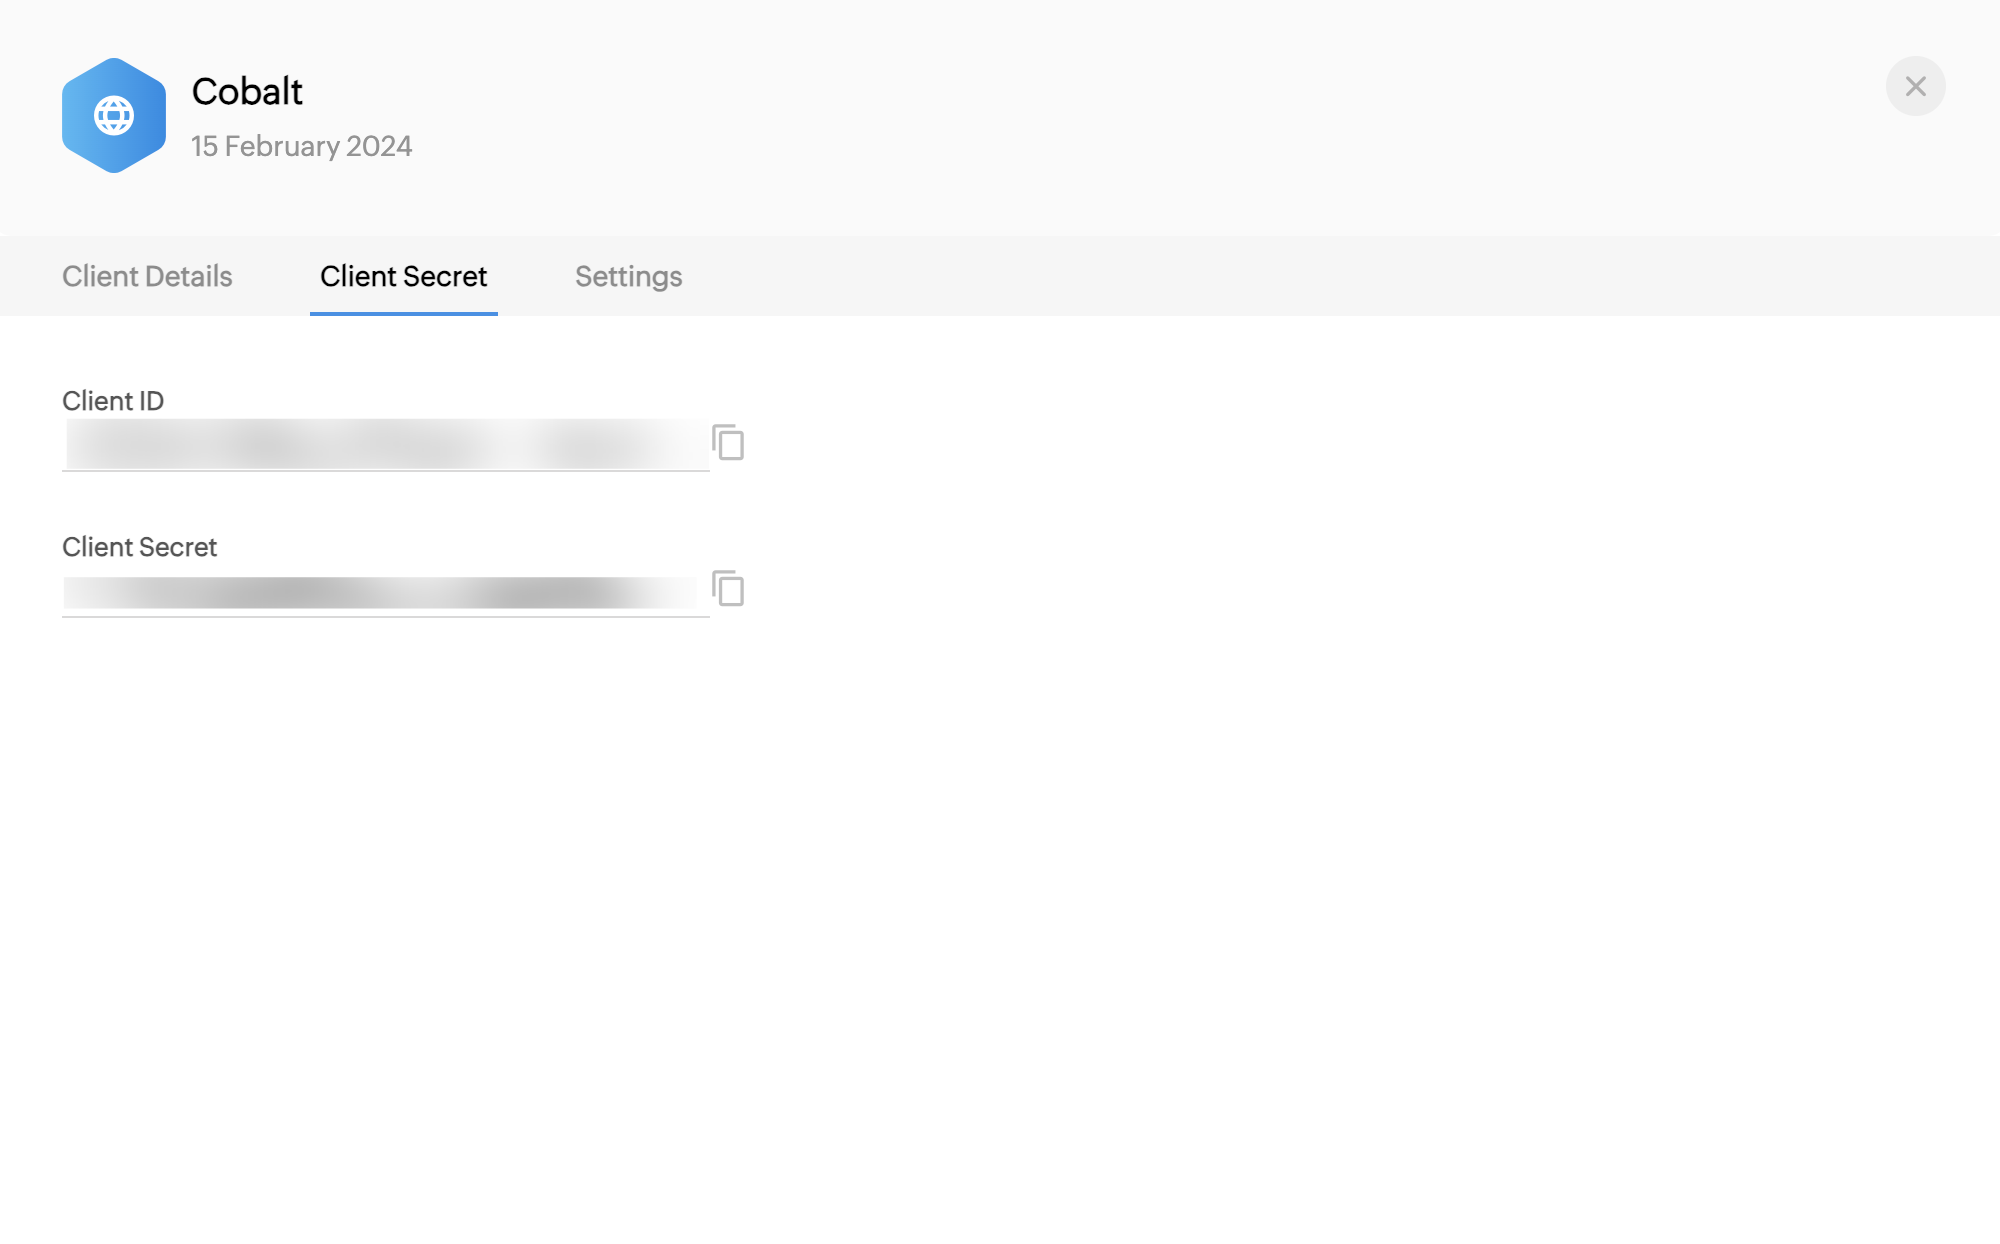
- Navigate to the
Client Secrettab in the app and copy the Client ID and Client Secret.
Configuring credentials in Cobalt
App settings page lets you configure the authentication settings for anOAuth2 based application. For your customers to provide you authorization to access their data,
they would first need to install your application. This page lets you set up your application credentials.
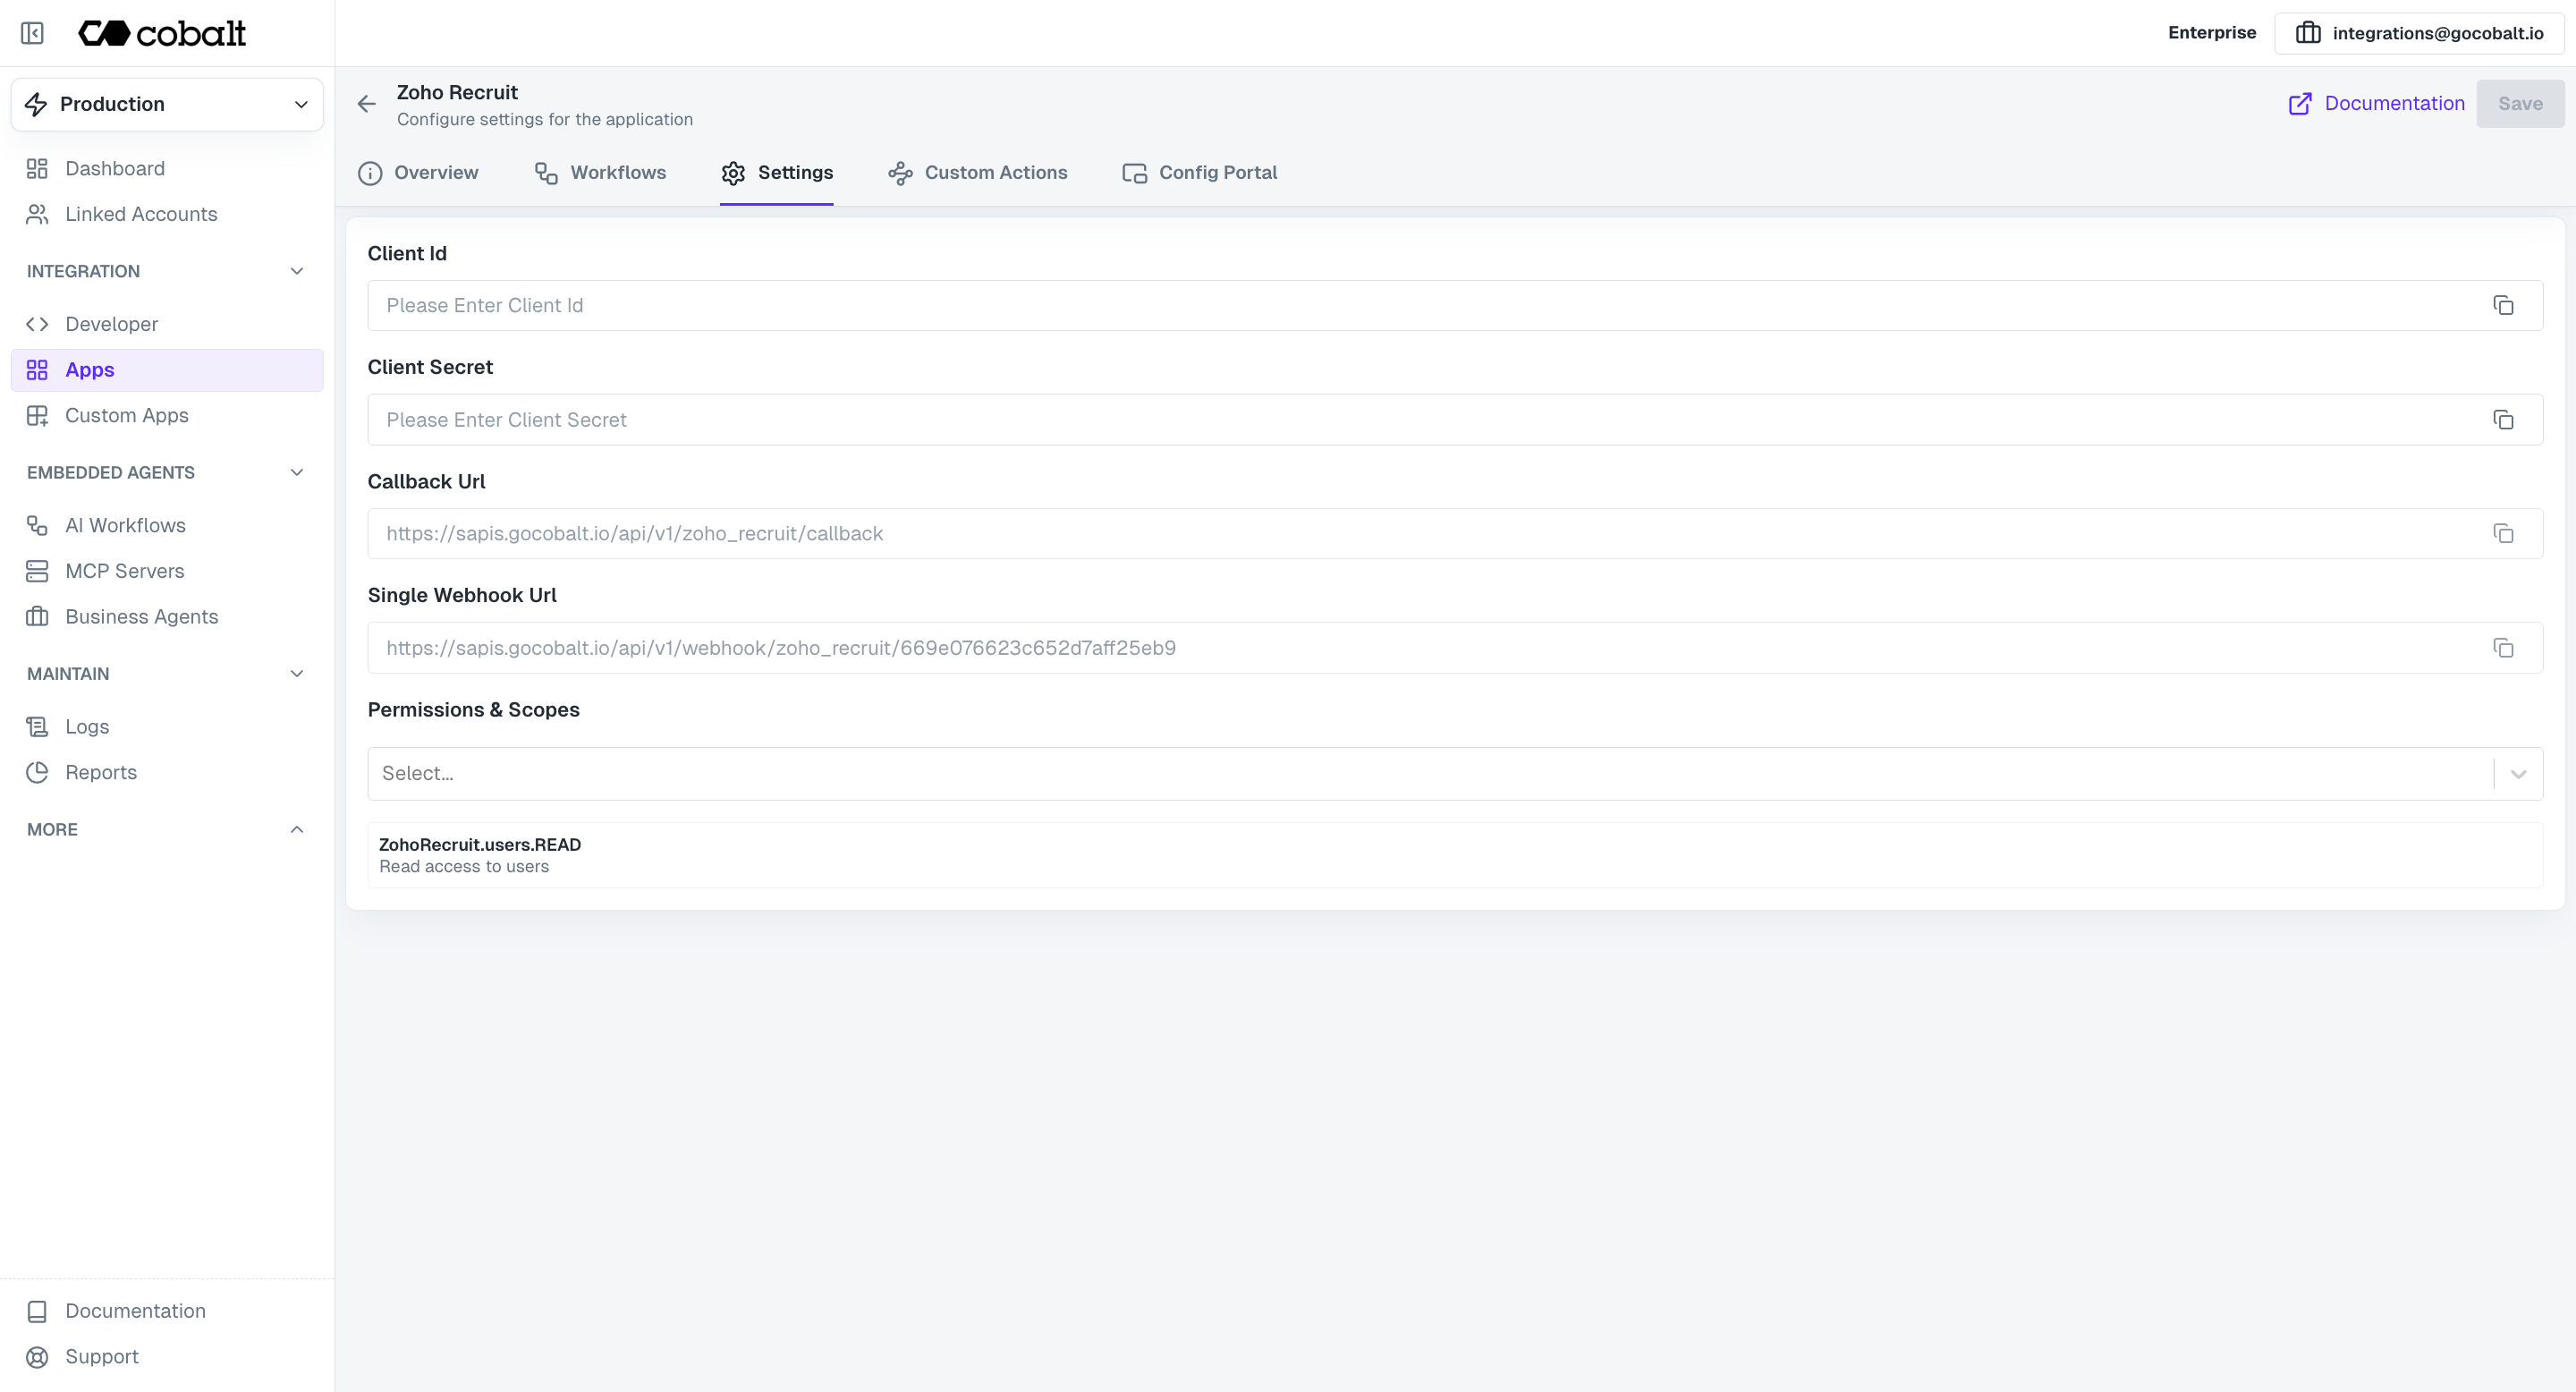
Configuring Scopes
Cobalt lets you configure what permissions to ask from your users while they install your application. The scopes can be added or removed from the App settings page, underPermissions & Scopes
section.
For some applications Cobalt sets mandatory scopes which cannot be removed. Additional scopes can be selected from the drop down. Cobalt also has the provision to add any
custom scopes supported by the respective platform.
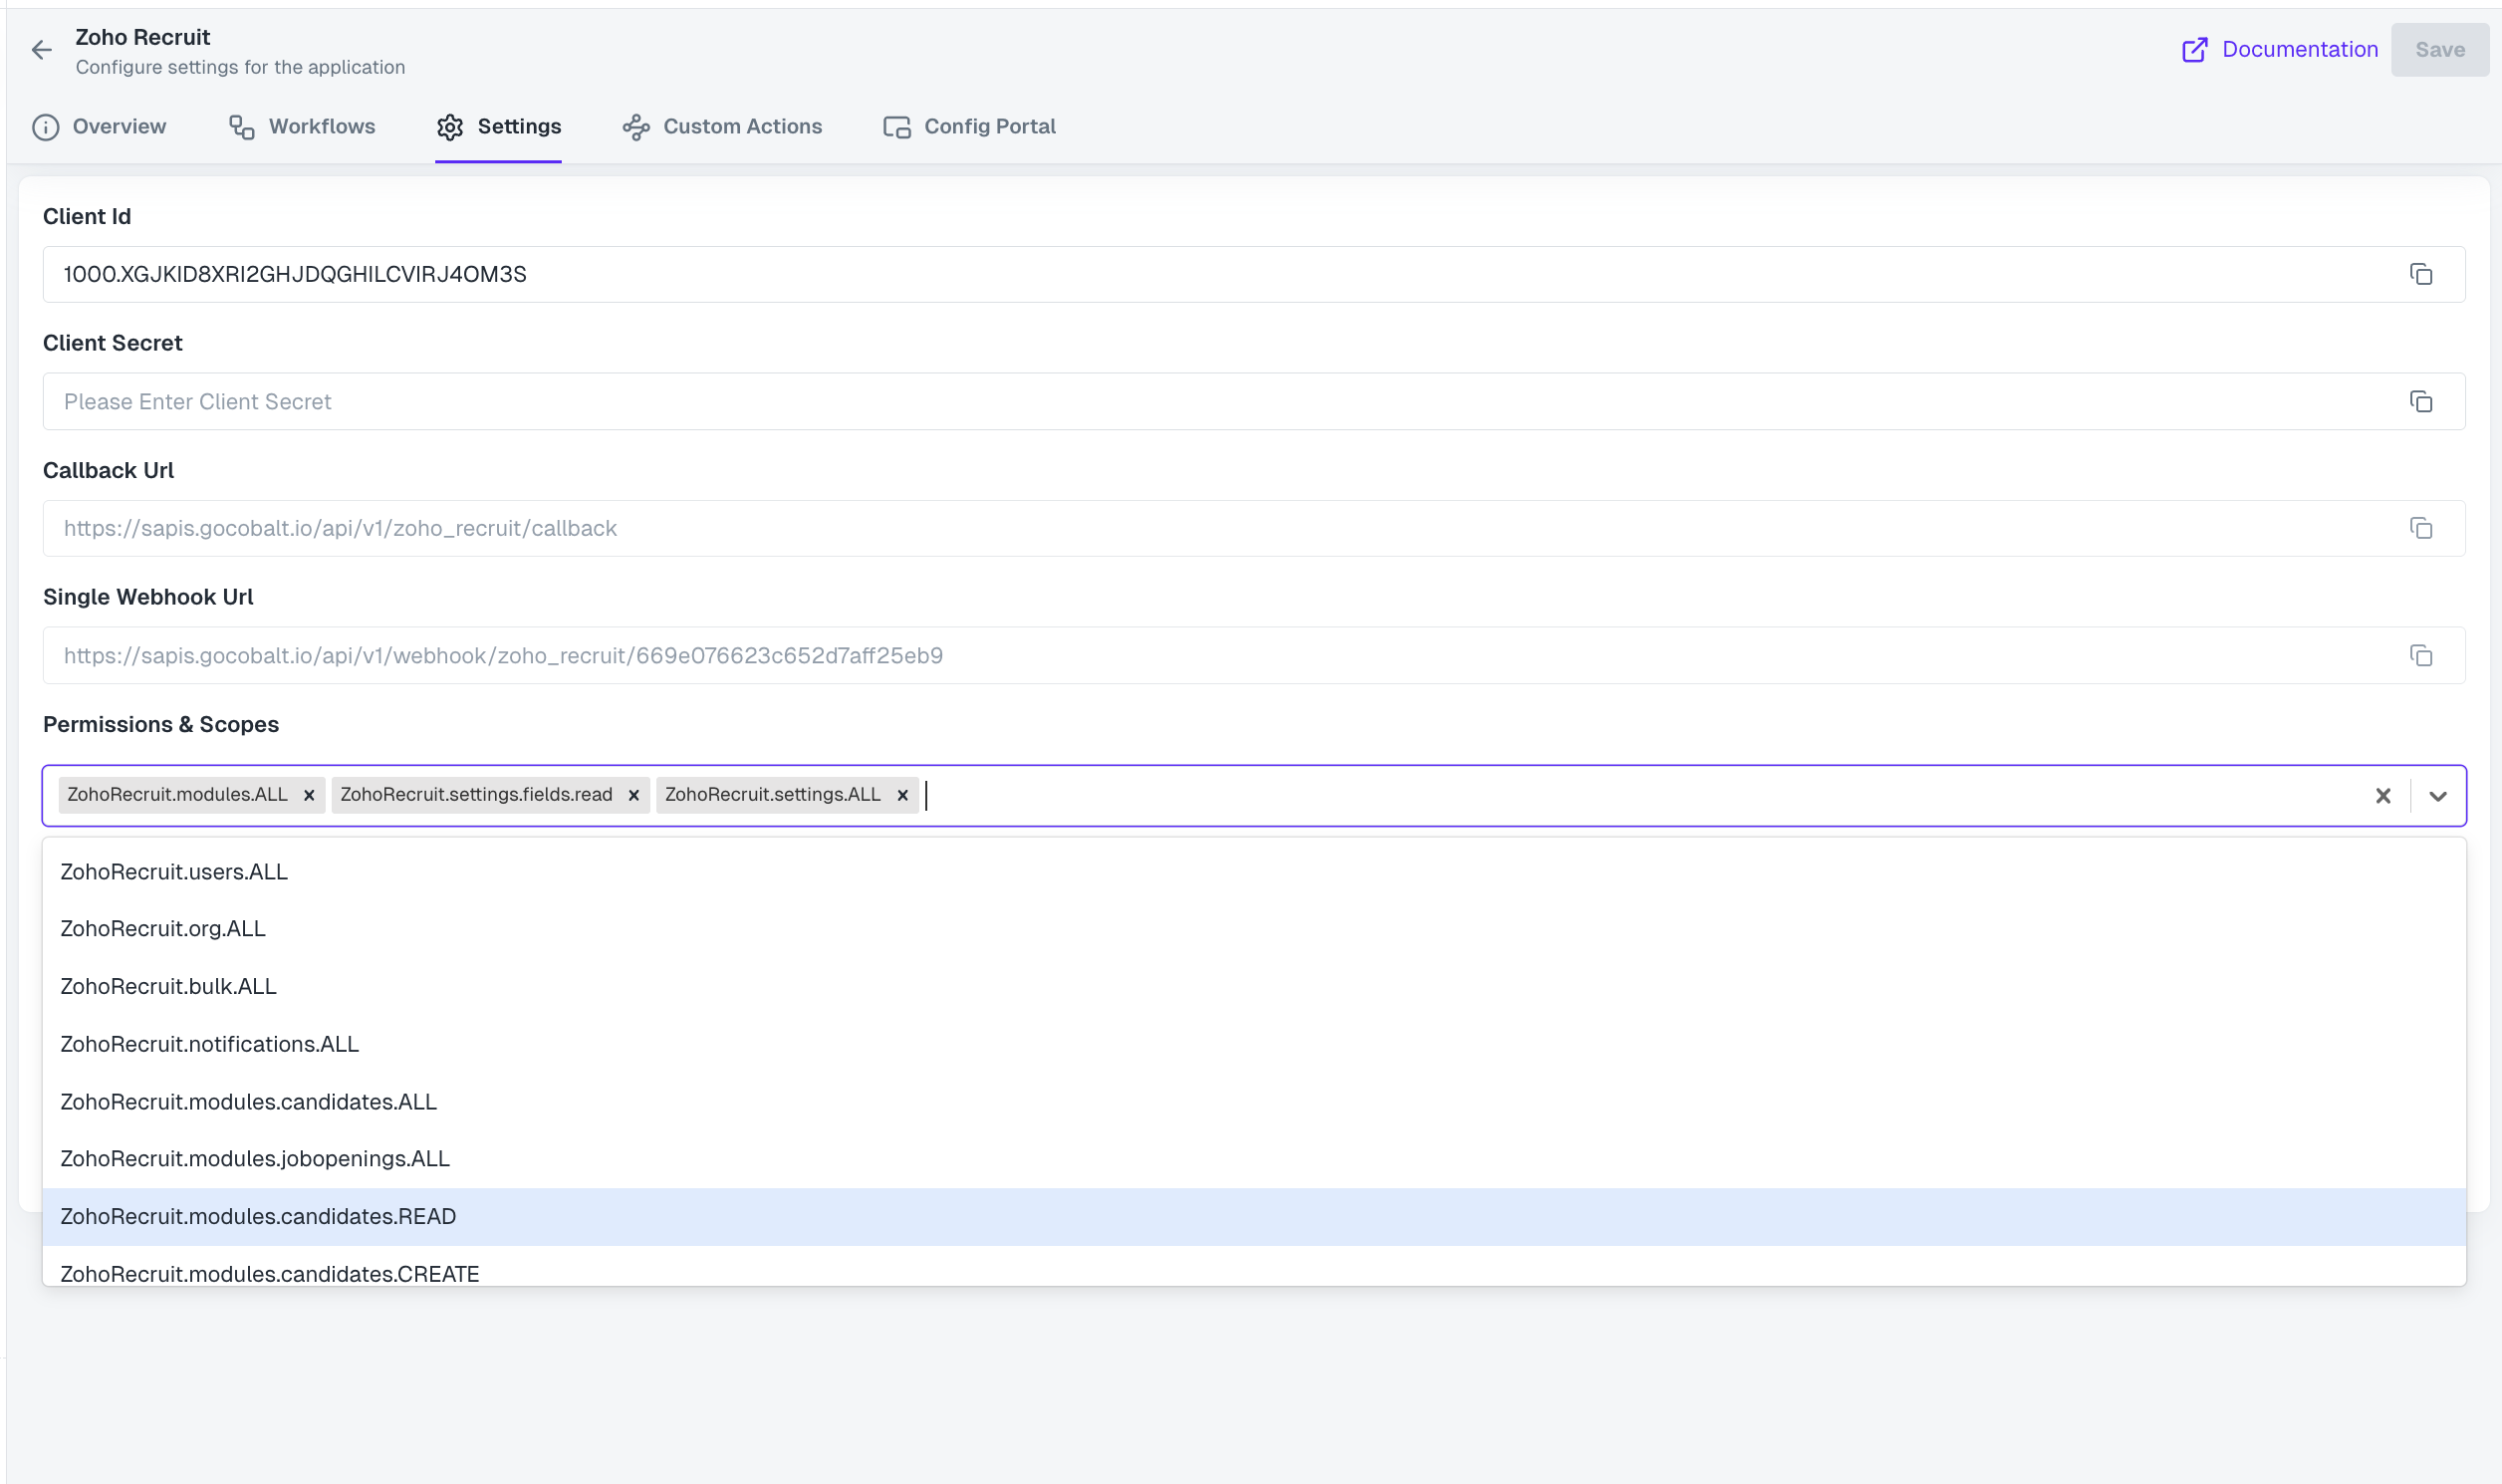
Zoho Recruit Single Webhook URL
If you wish to create an orchestration where a workflow is being triggered when some operation occurs in Zoho Recruit, you’d need to create a Zoho Recruit’s Webhook and add it as a Rule. Cobalt provides a single webhook URL to manage such event triggers. The steps given below needs to be followed by all of your customers to setup webhooks in their account. Let’s setup the Candidate Status changed webhook in Zoho Recruit. For this you need to do two steps:1. Create Webhook Action
- Select Zoho Recruit from the application list in Cobalt > select
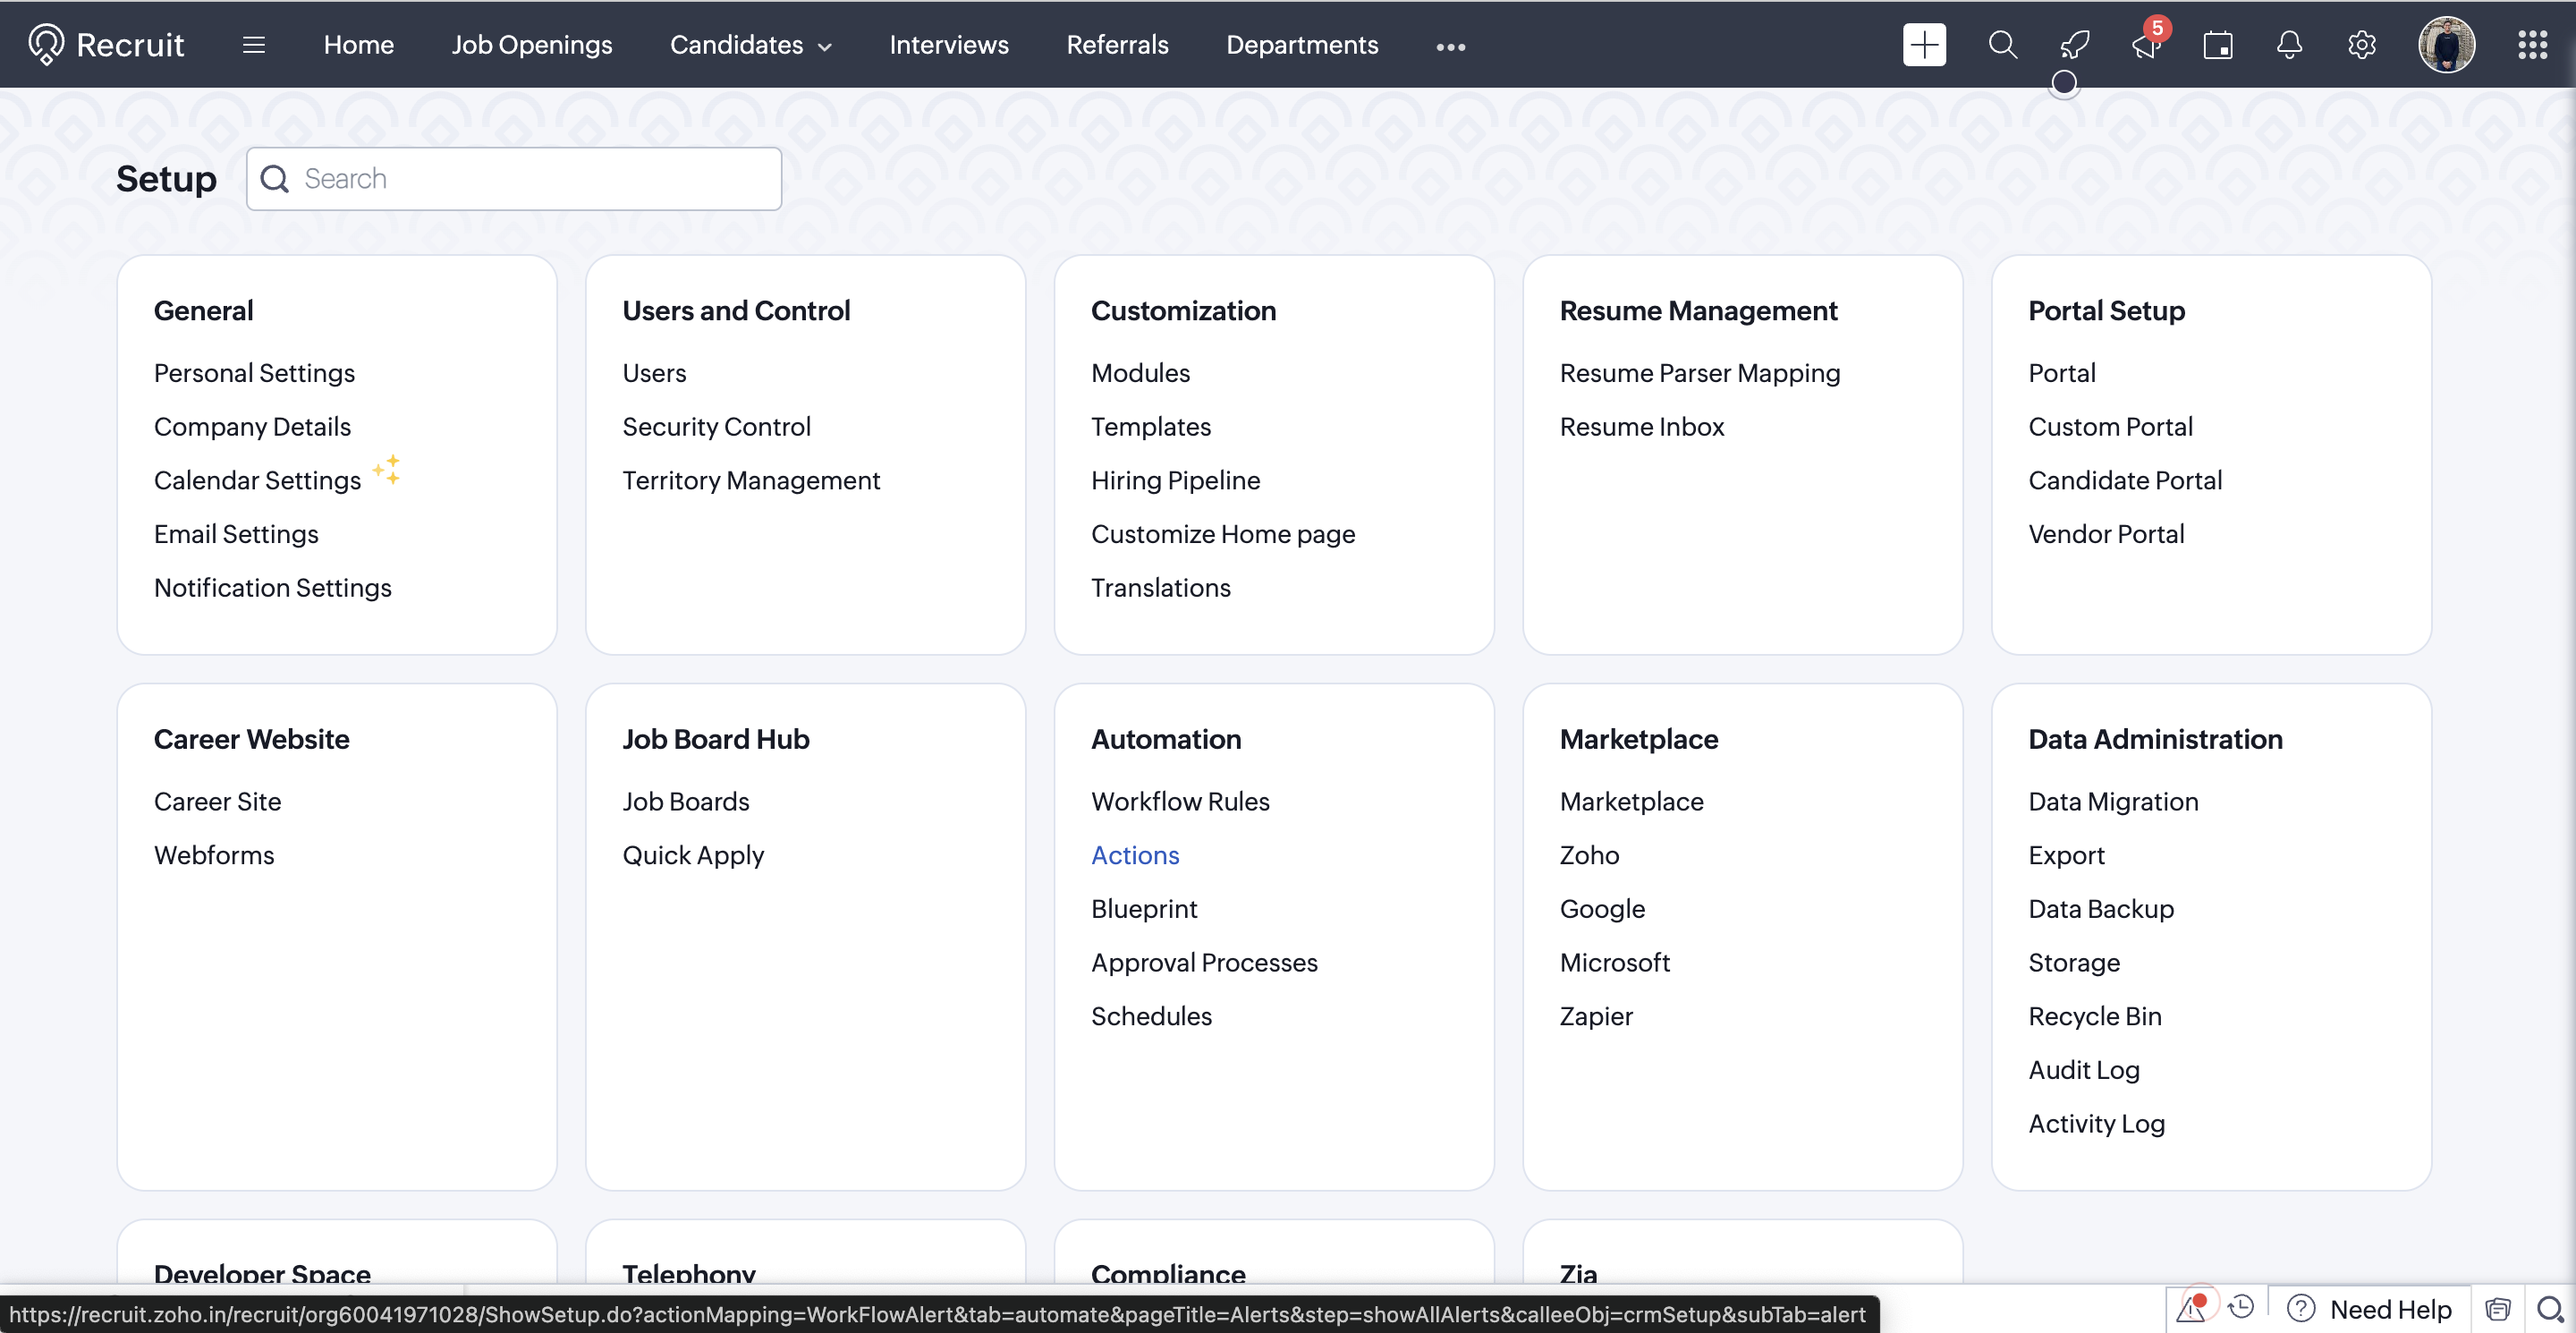
Settingsand copy theSingle Webhook URL. - In Zoho Recruit, click on
Setup(Gear icon) in the top bar and selectActionspresent under Automation.
Your customers’ accounts should be on Zoho Recruit Standard or a higher plan to use webhooks.
- Switch to the
Webhookstab and click onConfigure Webhook. - Provide a Name > Paste the
Single Webhook URLthat you copied under URL to Notify and select the Module asCandidates. - Under
Append Entity Parameters, go to Parameters in the User Defined Format, give theParameter Nameas data and copy the JSON provided below inValue Descriptionfield.
- Under
Append Custom Parameters, you need to add two parameters:
- First parameter name is
eventwhose value will becandidate_stage_changed.The value of event will change based on the trigger that you are trying to setup. - Second parameter name is
identifierwhose value will be the email id of Zoho Recruit account that is being used.
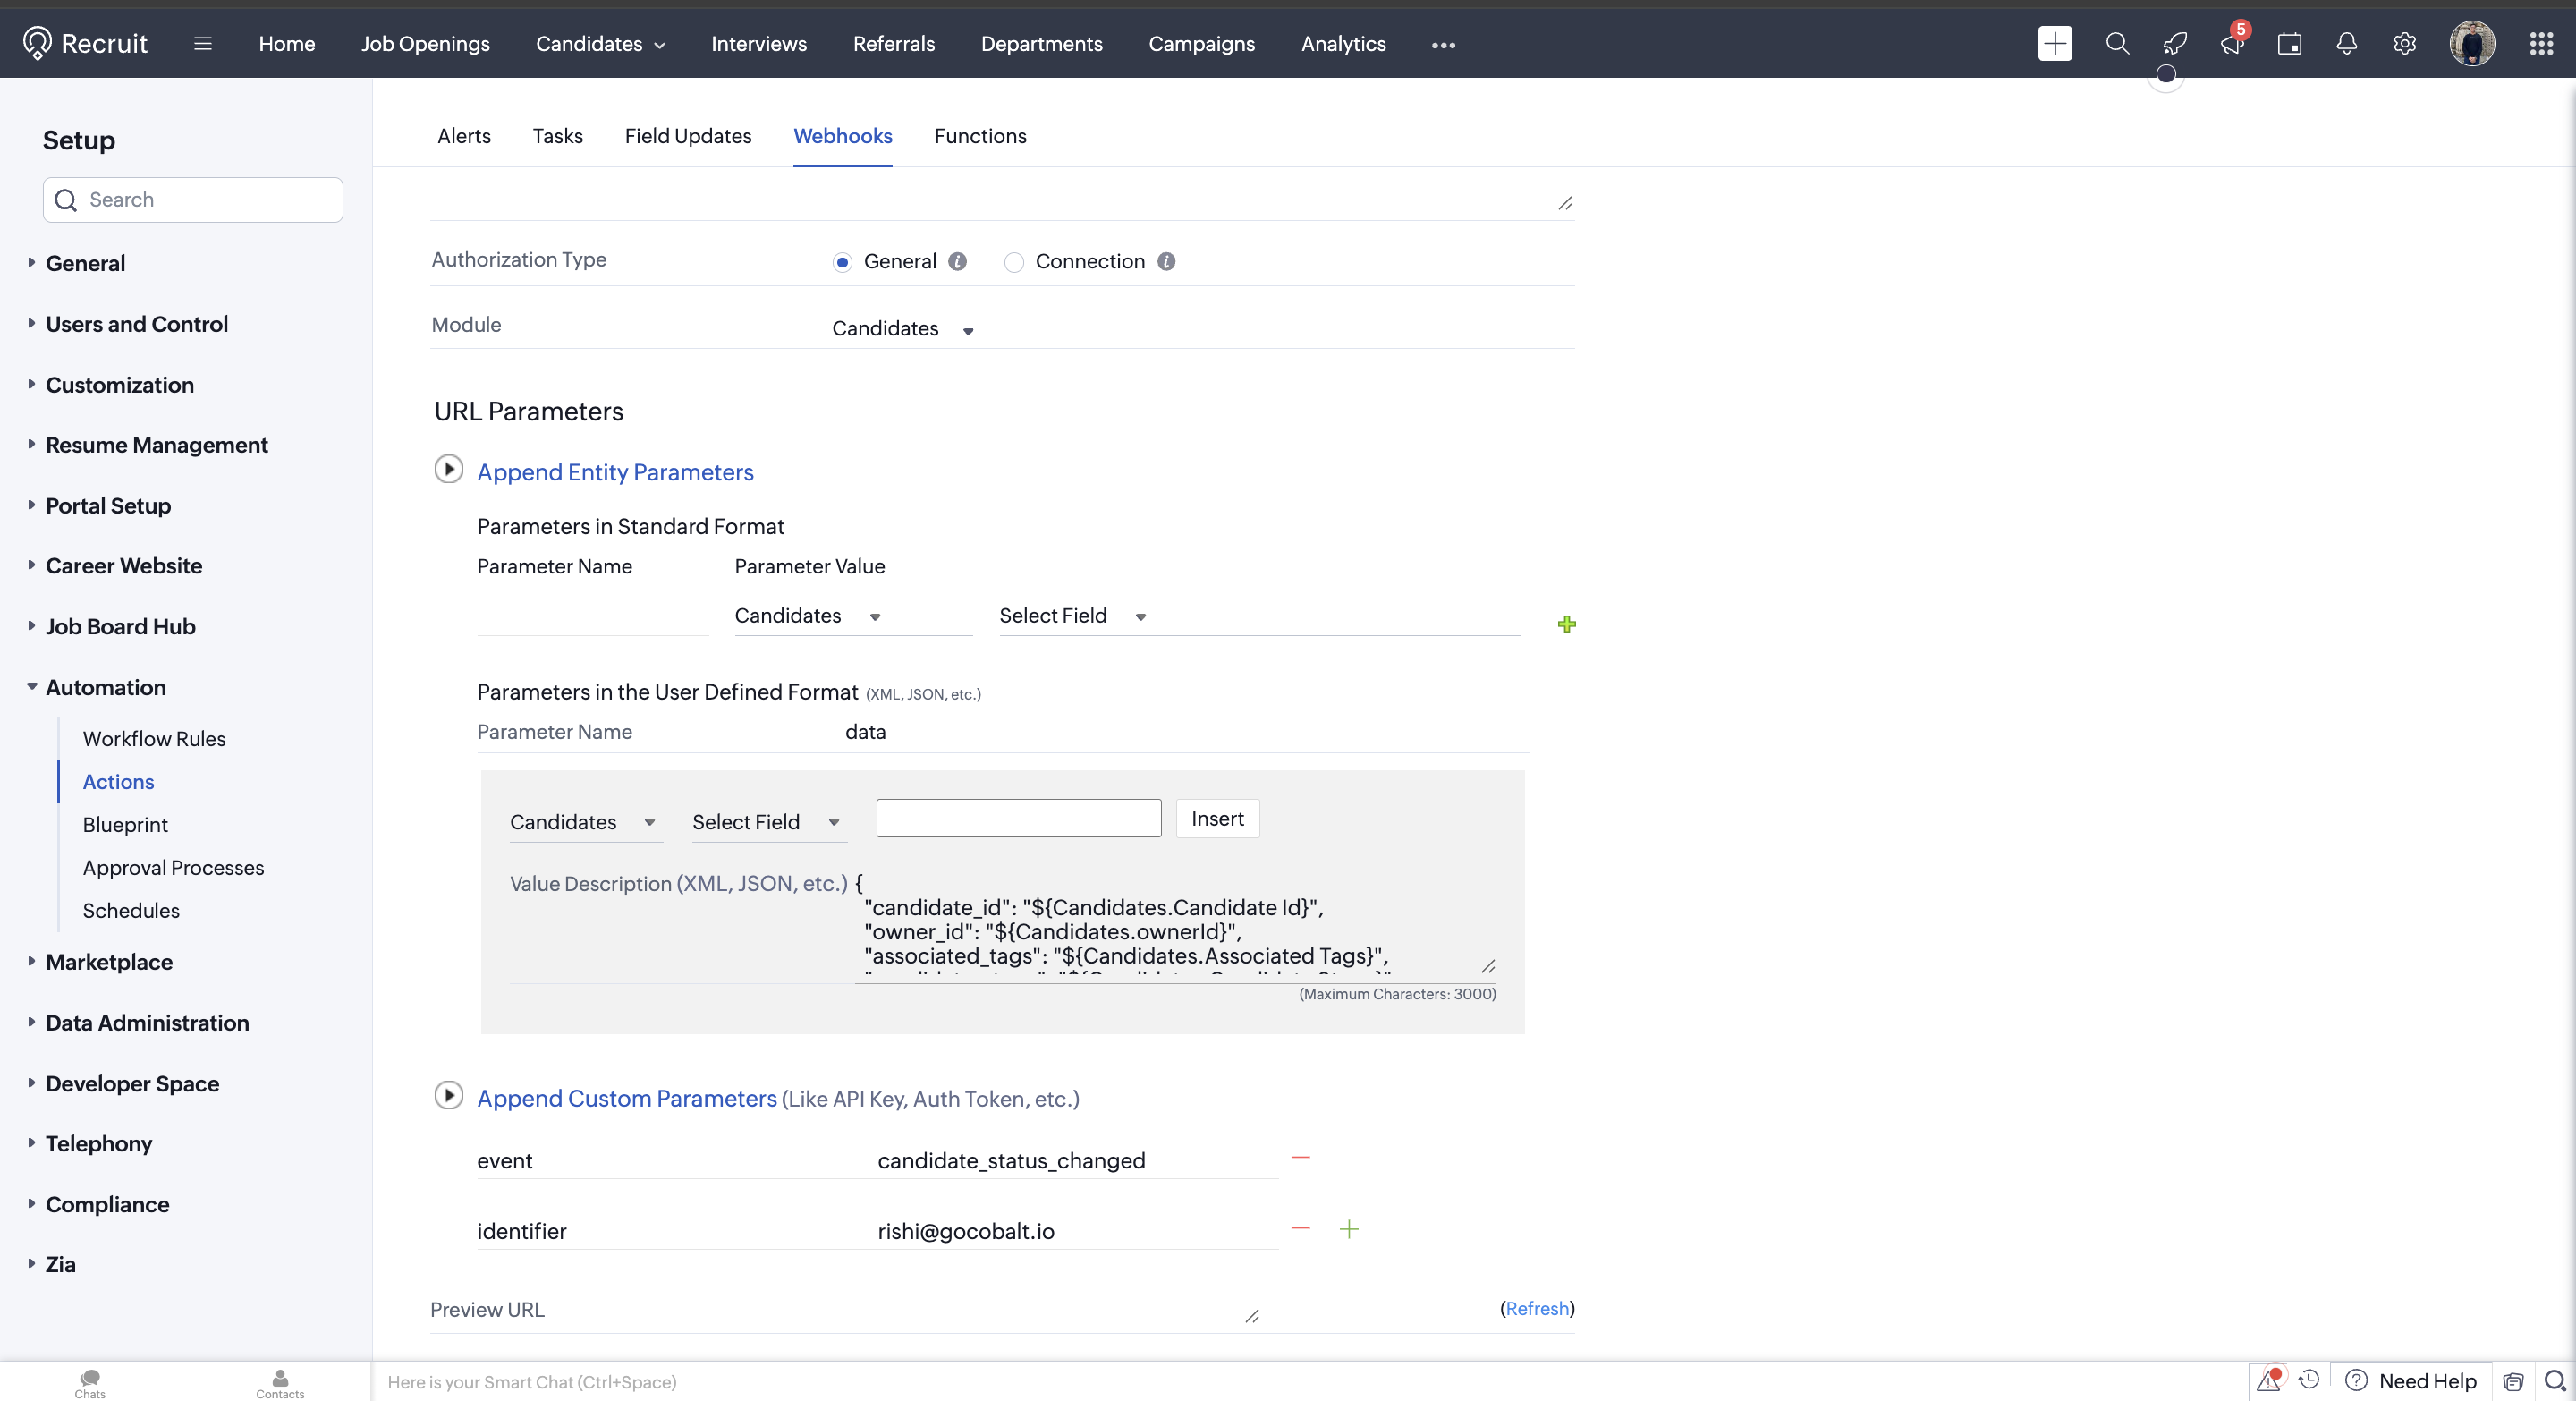
- Click on
Saveto add the webhook.
2. Create Workflow Rule in Zoho Recruit
Once the user has created a webhook, they now need to add it as a Rule in Recruit so that it fires Cobalt event.- Navigate to
Workflow Rulesunder Automation and click on+ Create Rulebutton. - Select Module as
Candidates, add a Rule Name and click onNext. - In the Rule, select
On a record action> ChooseCandidate Stageradio button for the Candidate Status Changed trigger and click onNext.
- Select
All Candidatesas the Condition 1 and click onNext. - Select
Instant Actionsand click onWebhooks. Select the Webhook that you created and click onAssociate.
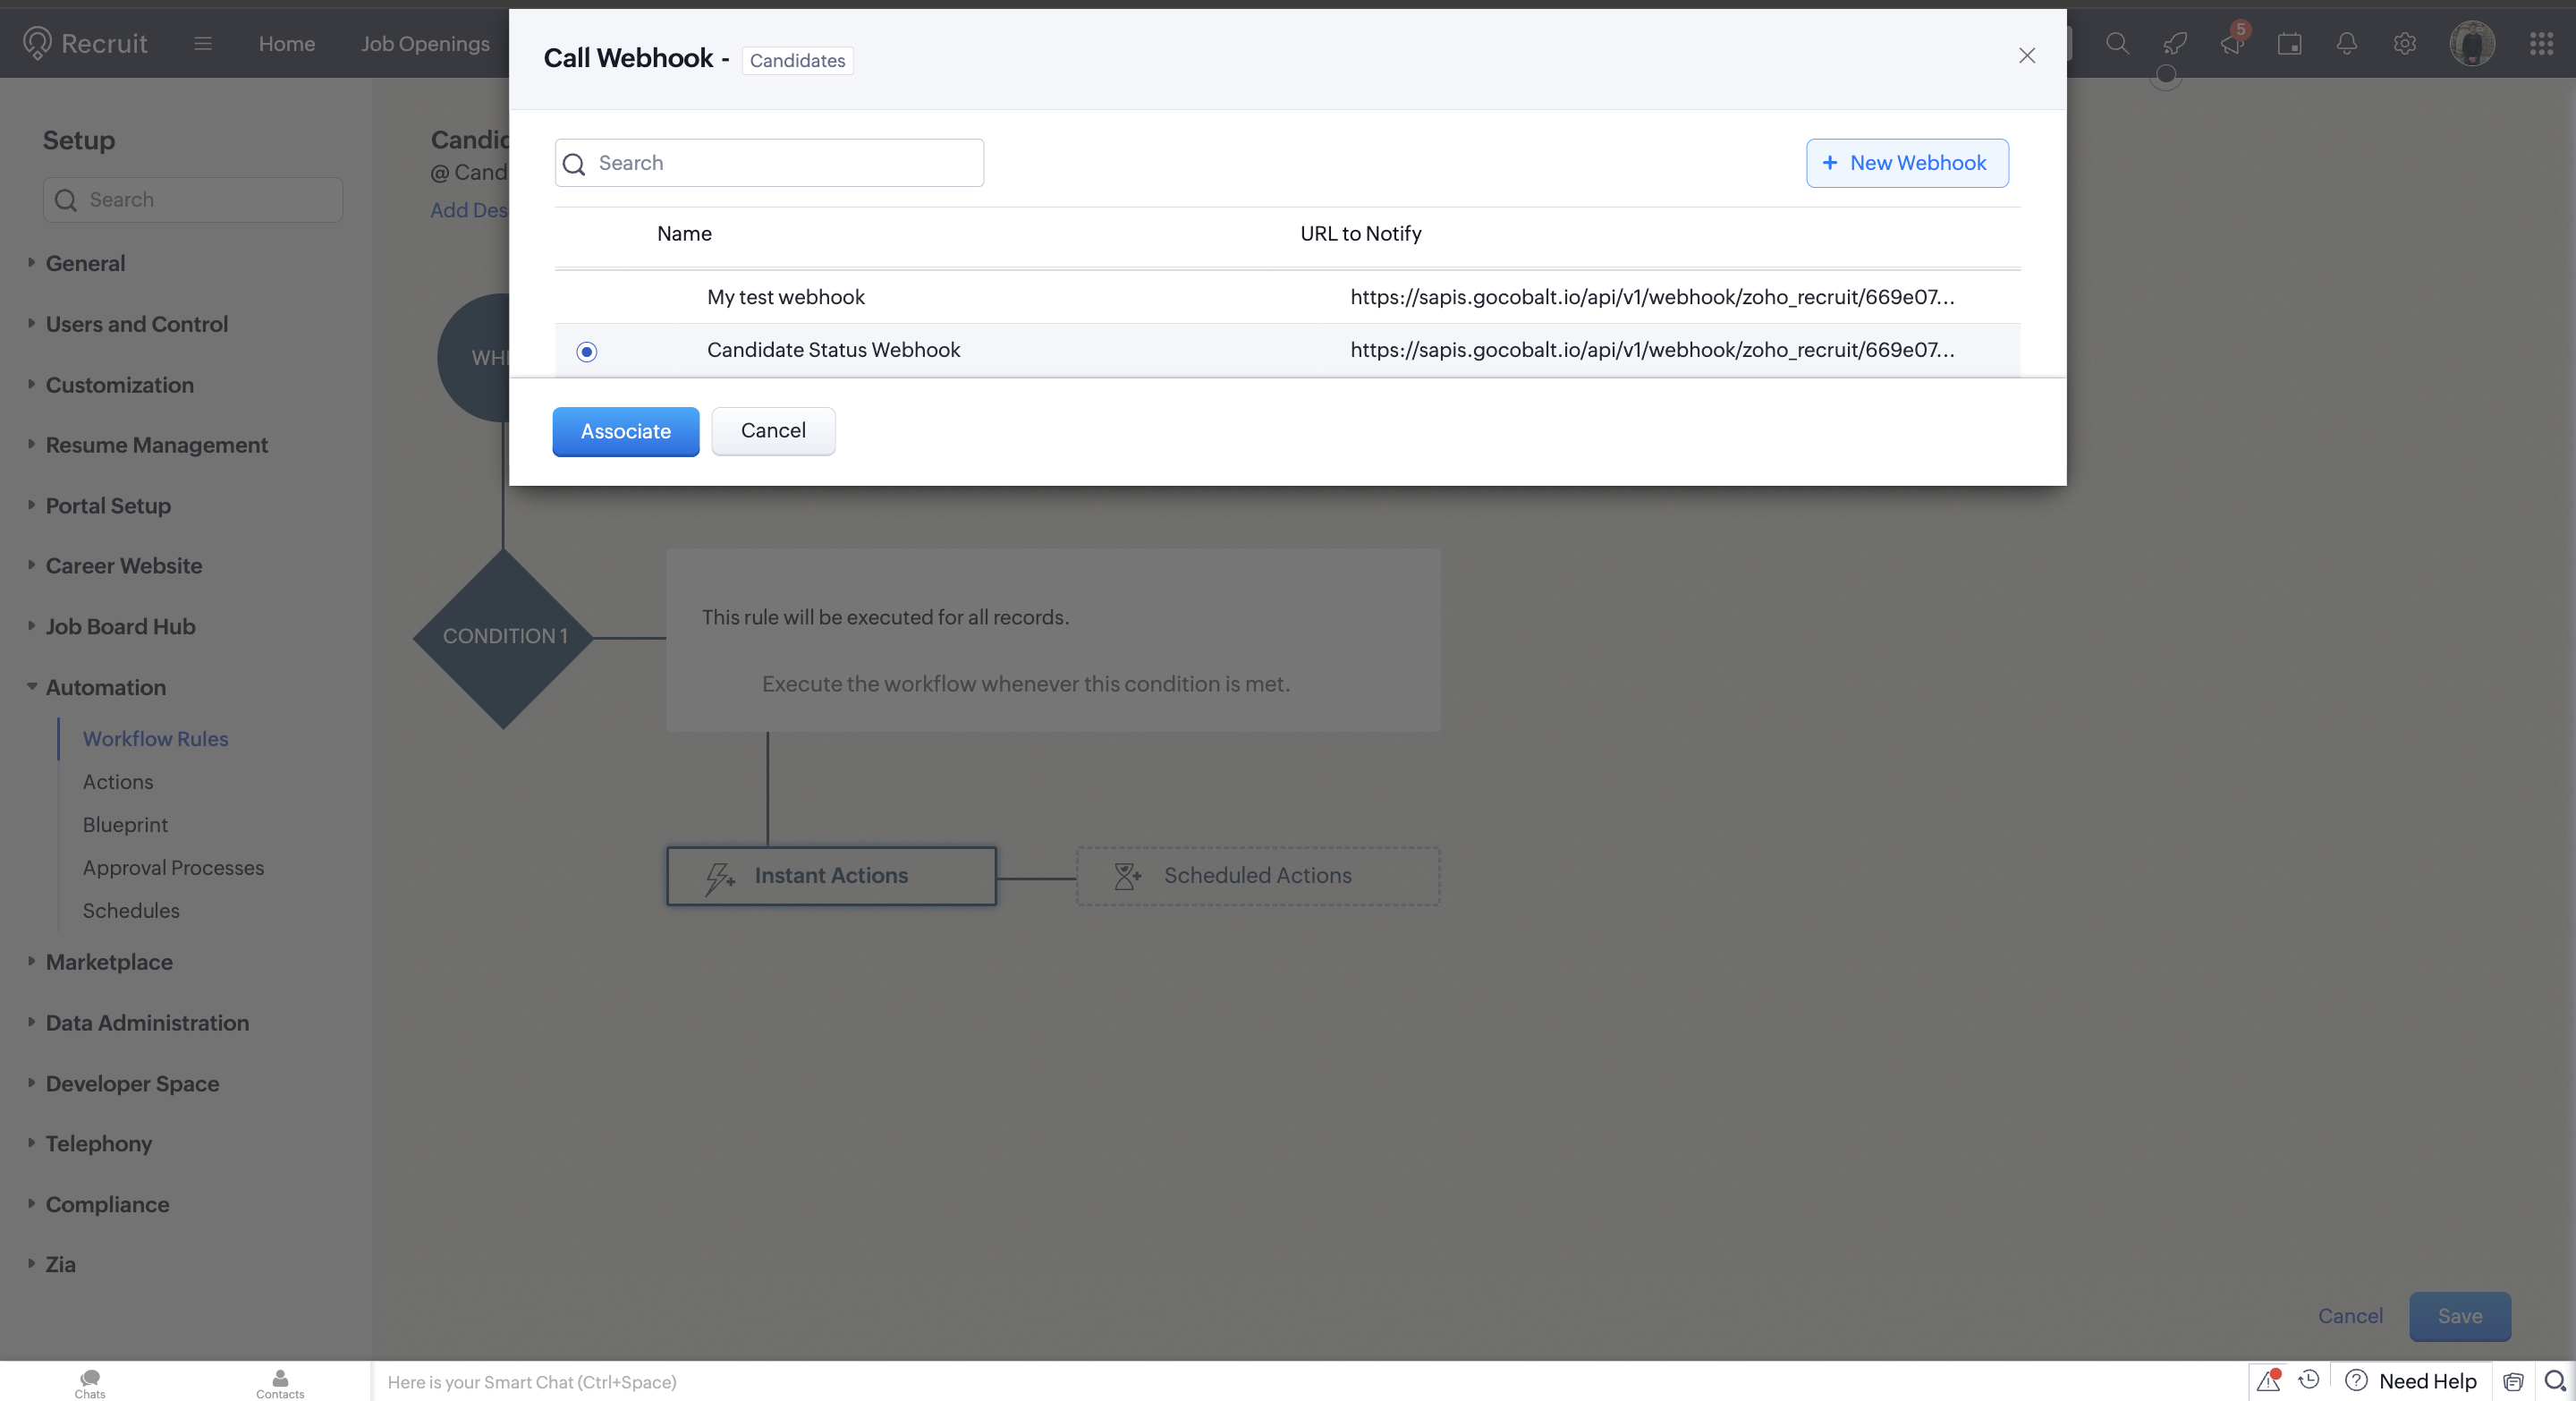
- Click on
Saveand your webhook is now completely setup for use.
Actions and triggers
Once the above setup is completed, you can create orchestrations of your use-cases using Zoho Recruit actions and triggers. Following are the set of Zoho Recruit actions and triggers supported by Cobalt.- Actions
- Triggers
Application
Application
- List Applications - List all applications in Zoho Recruit.
Candidate
Candidate
- Create Candidate - Create a new candidate in Zoho Recruit.
- List Candidates - List all candidates in Zoho Recruit.
- Upsert Candidate - Upsert a candidate in Zoho Recruit.
- Change Candidate Status - Change candidate status in Zoho Recruit.
- Associate candidates with job openings - Associate candidates with job openings in Zoho Recruit.
Job
Job
- List Job Openings - List all job openings in Zoho Recruit.
- Create Job Opening - Create a new job opening in Zoho Recruit.
- Update Job Opening - Update a job opening in Zoho Recruit.
Note
Note
- Create Note - Create a new note in Zoho Recruit.
- List Notes - List all notes in Zoho Recruit.
- Update Note - Update an existing note in Zoho Recruit.
Tag
Tag
- Create Tag - Create a new tag in Zoho Recruit.
- Add Tag - Add tags to a record in Zoho Recruit.
Others
Others
- HTTP Request - Make HTTP API calls to any Zoho Recruit documented REST APIs.